Happy New Year!

Hey folks! Well now, 2026. Hoping you all had a great break over the Christmas period enjoying some festivities and spending it however you liked be it with friends and family or in the peace and quiet of your own company.

As 2025 drew to a close there was lots happening my side – completion of the workshop for starters, a new job role and some spectacular opportunities I’ll save for another day but I figured those of you who may have one of my LED light kits for their favourite protocol droid might be keen to know I’ve developed a little more code!

As a few of you had been asking for various functions and changes, although I don’t do much coding myself at present I figured it was about time I’d got my hands dirty and gave it a go. So, for anyone keen to spice up their kit with something a little more natural I’ve developed two more sketches for the led driver boards. You can find them here on my gitlab page ready to download and push to the arduino.

I’ve tried to include some comments in the code so users can read what functions do what and how to change them if they wish. Of course I will keep the original sketch available if anyone ever wants to revert back to that but now you have the options of a slow fade in on power up with an occasional flicker to replicate power spikes and a slow fade on with a little flash then occasional flickering to give it a more realistic feel than the constant bright colour it was before. Have a play, see what you think!

I’ve got quite a few things planned for this year so keep your eyes peeled!

All and the best and once again, Happy New Year to you all!

Chris

3PO LED Eye Kit – New Version!

Well, its been a while! I’ve been quietly, very quietly, cracking on with a few unexpected DIY jobs around the new house which has unfortunately taken all of my focus of late but with that comes news of plans for a new workshop! Come the end of June I’ll finally have a new work area to begin scheming new idea’s and continuing work on my projects whilst getting the space itself up and running.

In the meantime, a few folks have contacted me regarding my 3PO LED Light kits and following some fantastic feedback from a number of people over on the 3PO Builders Community page I am pleased to be able to offer a new version!

This new version has a slight modification to the LED boards, specifically reducing the inner diameter of the eye tube hole, allowing me to decrease the distance between the RGB neo-pixels. The result, a slightly more screen accurate look where the LED’s will sit closer together. This probably would never have happened without the group providing valuable and constructive feedback so I’m really happy that people have spared time to review and think about improvements I could make to the kit.

I have uploaded a video of the kit here if you are interested in seeing how it works and what is included and a short gallery of images below. As soon as I have finished more kits I’ll make them available via my shop here.

A foot in the right direction…

Hey! So, its been a while but I figured its about time I started getting things back on track and what better way than to put one foot in-front of another and just get started. Again.

When creating my favourite protocol droid I tried a number of different ways to create the footshells and I’m still experimenting! I started with printing a set in pla+. At the time I thought slicing the footshell midway around the ankle would be a good idea so I could fit poppers and add some elasticated strapping so the back effectively snapped to the front shell. All that happened is the back wants to move up and down along the plane which I sliced and its annoying. I still think I could make it work but there is not much room for poppers anyway so perhaps a non-starter. The shells do look nice however having benefitted from being vac metalised like the rest of the suit.

I was never quite happy with the quality of my pla+ shells, the prints had small gaps which required filling, sanding and they were incredibly rigid. From here I figured I would try something different, making a mould of sorts and then vac forming….this is still a work in progress as it took a while finding someone with the experience of vac forming. Who knows maybe one day I’ll buy or make my own vac former…..the idea is on hold pending an imminent house move.

Next up I came across a set of rubber feet supplied by another maker – I thought this would be a winner but on arrival and opening the box I quickly saw they wouldn’t work out. The quality was questionable having been cast from a fibreglass suit, they were most definitely not sized as described and would by no means survive going in a vacuum chamber as the rubber was of inconstant thickness in areas. Top tip for potential builders here; learn from my mistakes and avoid recasts….especially if you wish to wear a suit. Its highly unlikely any parts will fit and the amount of time you’ll need to make good the suit you may as well invest in 3d printing or outsourcing it (if you can) to someone which will not only give you a more customised scale suited to you but much easier parts to work with and achieve a better finish. This and files are out there for free which have been created in mind for someone to wear the parts or use as a static display….most recasts these days are made from a display piece only such as a Don Post statue – so you’d be on the back foot trying to engineer something to make it wearable!

Back to the drawing board, I had thought of abs or petg prints for the purpose of making a mould or ‘buck’ to vac form shells but then I thought about TPU….for anyone not familiar with this it’s a filament material which resembles rubber but you can get it in different grades known as ‘shore rating’ which relates to its flexibility/rigidity.

Having a friend with a large scale direct drive 3d printer and being happy to help really spurred along the progress at this point. Within a few weeks I had a set of feet turn up on my doorstep.

Similar to the rubber shells these too wouldn’t likely survive the vac chamber process but I’d been put onto Liquitex, an acrylic based material which is semi flexible and paintable!

Liquitex is a thick acrylic paste that you can dilute with water. This helps allow it to settle in all the recessed areas and between those pesky layer lines as anyone who has printed in TPU before will know they can be difficult to sand out. After a few layers and ample drying time (consistency depending) between each layer they were ready for sanding and then some paint. Another tip for folk here is test any lacquers first on rough parts, don’t ask me how I know but the pictures speak for themselves

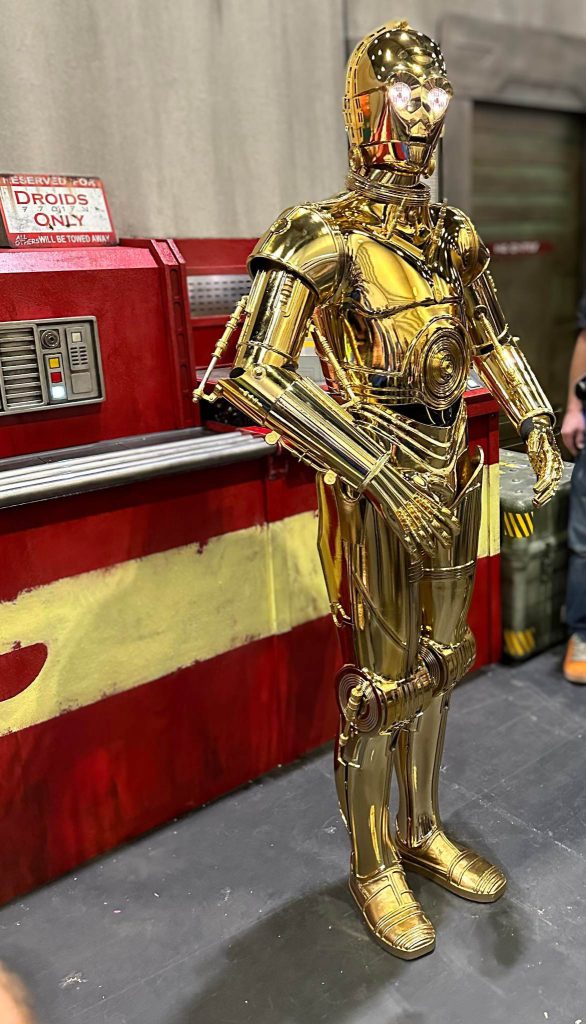
The last couple of images above show the finished item against vac metalised parts and whilst they are clearly not as shiny and reflective they don’t appear to be out of place or detract from the over all aesthetic. I’m very happy with the outcome anyway and they’re really comfortable. End of the day, if you the maker are happy with the things you make then does it matter what anyone else thinks? I’m building this for myself and when fully suited only fellow makers may perhaps pick up on the colour difference and start to question why.

That’s it for now, thanks for reading, I hope you found some if it useful and get in touch if ever you have any questions or just want to chat about projects!

Star Wars Celebration Europe 2023: London

An event not to be missed for any Star Wars fan, Celebration! This was/is a BIG event for me, not only because of the chance to help out again with fellow droid builders stand, putting on a display to the public, meeting and greeting fellow Star Wars fans but I also have the honour of participating in the STEAM room on the 3rd floor. For anyone who heard of this before please check out https://www.grantimaharafoundation.org/ I had the most wonderful time. Taking part in the STEAM activities was an incredible experience I will never forget and hope to do again in future.

I also had the another great first experience at Celebration due to it being my first outing ‘as’ 3PO. A character I’ve enjoyed seeing on screen in all the Star Wars films over the years, portrayed brilliantly by Anthony Daniels. Some may jovially poke, it being the first droid I have officially completed but don’t get your hopes up just yet!

On average I suspect it was 45minutes to an hour to suit up and de-kit with two helpers on hand. Which if you are reading this, thank you James and Chris. I couldn’t have done it without you! It isn’t the most comfortable costume I’ve ever worn but I’m no strangers to Star Wars costumes (I also have a Biker Scout and RoTJ Fett) so I didn’t find it all that bad. The worst part for me wasn’t being bolted into the lid and unable to remove it myself but was actually the legs as I have made them just slightly too tall which pushed up the shorts. It made it very difficult to walk in. I had an extra complication that the shorts didn’t quite fit with enough room to spare in the thighs so it was like walking with splints, unable to bend and without forgiveness. A potential issue for 3PO builders using Jesse M’s files with the hope of wearing the costume. So, this is one area of attention I plan to focus on when I re-do them. At least I will have time to test fit before the next Celebration! 😉

From the Torso up I found most of the costume comfortable, not being one for crowds the helmet actual gave me some added comfort, feeling like it distanced me somewhat from so many people so it was a blessing in disguise. That said, on a hot day I am sure I won’t want to spend too long in it. The arms due to the solid brass parts were very heavy. On a good day I think this wouldn’t be an issue however I was under the weather for part of the event so struggled to stay suited up for long.

I really must start bringing out some videos as I have always intended. I am working up to it and will do reviews of parts, materials, pro’s and con’s etc.

A short clip one of the fellow builders managed to capture and edited together with some stills of my outing. Stay tuned for more updates.

Tinkering with Brass

Another night spent in the ‘workshop’ and this time making my own brass parts for 3PO. As I’d opted to upgrade the various arm pistons for brass but didn’t come with brackets I decided to use Jesse’s 3d files as a template. If you are part of the C-3PO builders group already on facebook you’ll no doubt know who I’m referring to but for those that don’t Jesse is the guy who painstakingly cadded up a very good version (and several iterations since I might add) of the 3PO suit and made it available for free, for all to download on the proviso no one starts trying to resell his files and/or rip people off – this of course is frowned upon and rightly so amongst the community because simply it doesn’t come under ‘community’.

Anyway, I printed out a few of these brackets, had them golded but they a) didnt look right and b) I didnt like the odds of them surviving a troop under the weight of the brass. Using them as a template I cut out new brackets from a sheet of brass I had spare for just such an occasion. Lucky that!

Brackets cut on the band saw, at least after I replaced the blade, I was ready to square of the edges and drill the mount holes. I marked where my limits to save re-cutting more blanks.

After cleaning each bracket up a little more with a file and sanding block I retested the fit onto the vac metalised arms and they’re ready for glue. I’ll add here a particularly useful bit of info and thats if you happen to fibreglass your own suit whether for display or wearing then add a few mm of fibreglass cloth to the inside of the bicep and follow up with a gel like layer around where the bracket would sit. This allows a third surface or face for adhesion, so you can be sure the brackets are held firmly in position.

Not bad for a first attempt I think. I was really pleased with the outcome anyway and it’s stuff like this that reminds me we are ‘builders’, we make stuff ourselves, we don’t just walk into a store and buy it off the shelf, we make, we build and honestly it’s all part of the fun.

A few people have contacted me about the brackets and said they’d like a set if possible and I’d love to help but I wouldn’t like to do a large number of these all by hand so after Star Wars Celebration I’ll be trying to organise a small CNC’d run to help people out and will then make them available here at cost. If you’re interested check back soon! Oh and see you at Celebration?!

3PO Updates

The past few days I’ve been tinkering around with some of the greeblies (random adornments) that you see on 3PO. They are solid brass made by a talented friend of mine and rather than glue some of them to the suit I opted for bolting them on where possible and reduce the risk of bits falling off and getting lost. It also allows me to remove the majority of them if the suit ever becomes damaged or if they need polishing without scratching the suit.

Above is one of the examples and on the upper greeblie I polished it up a little to show the difference in finish. It doesn’t look much but when all the brass is polished it does add a certain dynamic to the costume.

After marking out where I needed to I drilled and tapped suitable for M3 bolts. This is just what I had a lot of spares of. I was careful to measure the distance of the plunge on the pillar drill first as not to drill all the way through the brass as that would have been a disaster! Even tapping these was awkward and there isn’t much after the chroming process that doesn’t make you nervous given any bit of adding finishing touches could also result in damaging the suit.

Thankfully, all went well. The first of many brass bits to go…

C-3PO

After building astromechs a protocol droid seemed a logical choice, especially as so many fellow builders in the club kept suggesting I had the frame for it!

I must admit, I do quite like building things that you don’t see many of and its this that pulls me towards learning cad and electronics more and more amongst other skill sets. Although there is not so much a specific club, there are groups of people who have really helped and enabled me to develop my own suit.

Unlike the other droids til now, 3PO is entirely 3d printed. He’s come with his own unique challenges but it again is another journey and one which I look forward to follow for years to come.

If you are thinking of printing or building your own suit I can’t recommend the C-3PO builders group on Facebook enough. There are some very talented people out there and the kindness of some has enabled anyone with a 3d printer to jump into building their own suit.

I’ll jot down some updates again soon, so stay tuned!

#R2RND

I started my droid building journey some time back, perhaps around 2007/2008 after seeing the UK R2 Builders at a nearby event. I was immediately enamoured by what ordinary folk could achieve so close to, if not better, than an original! I realised it would be a huge undertaking and not something I could do in a day, week or month but I figured if they could then perhaps why not me?! I love making and building things and I had the most enjoyable chat with a few of the builders!

Simon, whose aluminium R2 was so silent, the foot drives were utilising a belt method opposed to chain drive! Due to this it seemed to have more response to others. As I found out in later years this isn’t just down to the ‘drives’ its also how the ESC is programmed but its surprising to see the difference of a belt driven R2 in handling and noise, more so in a quiet room.

Next up I met Brad. He was a tech guru and had the most tricked out droid (BHD). It had all the bells and whistles no doubt about it and even had the most sought after mod of all, a 2-3-2 mech! Not something he used often but amazing to see any time any where. The engineering this guy put into his droid, parts and electronics. Incredible. We had a great little talk and he really showed what can be achieved by putting the time in and not cutting corners….something which he would repeat to me every so often over the years!

Finally I came across Colin. A true gent. If I’m honest I put it down to him for all his encouragement from start to finish that kept me building. He saw my enthusiasm and suggested if I put the time in then its a very rewarding hobby and it is just that. His droid did everything he wanted it to and he went on to build some more fantastic droids.

I’d originally signed up on yahoo groups but gave it 6-12 months of research on astromech.info and astromech.net (the main builders forums) before I started my first droid, a styrene (HIPs) build and years later I’m still building and starting my own aluminium droid (R2-RND!) affectionately referred to as my R2 Research and Development droid.

So skipping forward a few years…after my first build and many events I had the opportunity to purchase someone elses work in progress. A fellow builder called Max, who was an engineer and had slowly been using information he’d gathered to build his own droid from scratch….all but the dome he’d made himself. The frame (as pictured above) for example based on documented JAG designs (another builder in the US). Max had done a great job with so much but it was still far from finished and as I found out when rebuilding things…the frame wasn’t entirely up to spec but he gave me the first foot up onto the ladder and in return he was able to pursue his new hobby – American muscle cars! I remember being a little nervous for spending so much in one go on a hobby but then he did give me a ride in his Plymouth duster which was incredible!

So R2RND continues to be a project, years on and I continue to read up on things, learn new stuff and one day I will finish him but I’m in no rush. The important thing for me is to continue enjoying what I do. I don’t have to spend every day working on something until its done, I have multiple projects on the go all the time because I like to dip in and out of them. I guess its like people enjoy reading but don’t wish to read the same book or genre all the time, sometimes they like to find something different to occupy their mind.

So anyway, there is a little back story to R2RND. I’ll keep updates coming and I’m sure you’ll see a few other projects coming up in between too.